Monday 14 December 2015

Poinsettia Table Runner

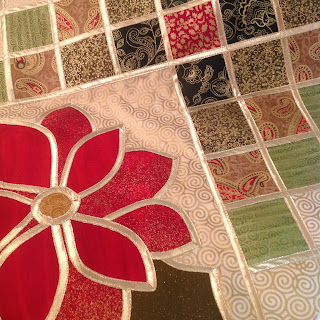
My quilt teacher recently moved into a new studio.  At the grand opening she had a display of student's work where I fell in love with a poinsettia table runner, and immediately signed up to learn how to make it.

The pattern is available from bear paw productions as a kit. I didn't use a kit, but chose my own fabrics.  Luckily my far too big box of spare fabrics contained plenty of glittery and gold fabrics, and I only needed to buy two fat quarters.  The gold leading is clover fusible bias binding, and you need two rolls, so this is not a cheap project to make.  Since I'd never tried this technique before I made two extra poinsettia blocks to practice, which needed another roll of gold- oof!

I don't know what method is recommended in the original pattern from Bear Paw.  The method I used was not difficult, but very time consuming.  The whole thing from start to finish took me about 25 hours. Although I love it, I will certainly think twice before making another!

First you trace the whole pattern onto a backing sheet. Then cut strips from your fabrics, which you back with bondaweb, then cut the strips into squares, and trim.  Iron the squares onto the backing sheet.  I love how you can take some lightly meh fabrics, cut them up, mix them up, and ooh!

The poinsettias are made like ordinary applique, by tracing onto bondaweb, then fixing into place. After everything is bonded into place, you apply the gold leading.   I was lucky to be able to borrow a mini-iron during my classes, which I'm sure made it much easier to apply the leading around the tricky curves.

Next, you need to sew down both edges of the leading. This process totally transforms the texture of the leading, somehow making it less shiny and more sparkly!


My most hated job is hiding and tying all those ends!
After the poinsettias are finished, sew the poinsettia blocks to the ends of the table runner, and apply the leading grid before sewing.  Even though these are easy straight lines, there are a lot of them, and I went quite slowly as I was trying very hard to be precise.


Finally you need to back and bind the runner.  Frustratingly I didn't have enough of the fabric I liked for backing and binding in one, so I had to do them separately, but finally the runner is finished!


I really, really like this.  It is just so bling and Christmassy!


Thursday 19 November 2015

Progress... or lack of...

It's been a long time since I last wrote on this blog.  Partly that has been due to frustration with the technology.  I have been trying to use an ipad and a smartphone, neither of which have been ideal. I now have a new laptop, and I'm hoping that it will be much easier to type, and add photos.  Since I haven't yet taken or transferred any photos of my crafting, here are some totally unrelated pictures from my holiday last year.

Seems to have uploaded OK, and it also is much easier to type around the photo on the laptop.  Good news.

On a slightly less positive note it was March when I last checked in on my projects.  This is the current situation:

Projects in progress
Lacy Scarf
Cross stitch train
Pink elephant
Minnie mouse bag.
Secret santa quilt
Party dress
Crochet doily project
Big Heart, little Heart Tank tops.
Rainbow ripple blanket
Puff flower blanket
Green and white quilt
Poinsettia quilt
Neice and Nephew Advent calendars.
 
Projects finished
Anna Dress
 
This does not look god for my new year's resolution.  It seems I am definitely a serial starter. However, some of these projects are nearly finished, and I'm confident to have at least two more items off the list before the end of the year.

Tuesday 1 September 2015

Doily challenge progress

Well it's four months since I started the doily challenge, and I have completed 23 doilies. This averages out at about one and a half per week. I haven't blogged all the doilies so far but I will. The main thing preventing me is my terrible lack of blocking. As you can see from the picture below, blocking is not something I am good at, even though it is badly needed. I do feel that if a doily is going to have a post all to itself it needs to be photographed in its best light.
At this rate, I should achieve my goal of 100 doilies in around a year. My doily making is going quite a bit faster now that I have decided to make each doily twice, immediately after each other.  This means that any problems I encountered on the first doily will be fresh in my mind for the second one, so I am less likely to get stuck on the same bit again.

Later I will need to make some design decisions so that the variety of sizes and patterns works for my project, but for now i'm going to try any and every pattern that takes my fancy.

Friday 28 August 2015

Hearts desire doily

Doily name Hearts desire doily
Pattern source www.redheart.com
Thread Anchor size 8 pearl cotton. 
Hook 1.25mm. 
Finished doily diameter 11cm
Finished doily weight 6g
Comments  Instructions were easy to follow. This doily took me about 2 1/2 hours.


28-50 soft lace motif doily

Doily name 28-50 soft lace motidoily
Pattern source http://www.ravelry.com/patterns/library/28-50-soft-lace-motif-doily
Thread Anchor size 8 pearl cotton. 
Hook 1.25mm. 
Finished doily diameter 15 x 20cm
Finished doily weight 6g
Comments  I really enjoyed making this doily. Each little flower is so easy, I was soon able to make them without looking at the pattern. Each flower. Only takes me about 15 minutes to make, so it's a bit addictive to see how many more I can squeeze out of little bits of spare time. The main downside of this doily is the number of loose ands which need to be hidden.

Monday 27 July 2015

Doily project - Rosette doily

Doily name Rosette doily
Pattern source http://www.crochetpatty.com/patterns/thread/rosette_doily.html
Thread Anchor size 8 pearl cotton. 
Hook 1.25mm. 
Finished doily diameter 17cm
Finished doily weight 7g
Comments  I found these instructions a tiny bit confusing as they seem to start each row with the last stitch of the previous row. However this was only a tiny thing, and overall this was a nice straightforward doily to make. 

The other doily in the photo is the tiny cluster doily. It is only 6cm across, and is made of clusters of five treble crochets.

Sunday 26 July 2015

Evening stars

The reverse side of C & R's quilt features evening stars in three sizes- 6", 12" and 18". Using this as inspiration I drew the layout on graph paper and numbered the stars so I knew how many of each size to make. After all the stars had been made I took over the living room to design the quilt. I don't have a wall big enough to lay out this design. I try to get a balance across the quilt of the colour values. As well as staring at it a lot, I took photos on my ipad, which helps to get more perspective. Converting the photos to black and white helps to identify areas that stand out.

After I had decided the final layout, I labelled every star on the floor, and on the graph paper. See the little white tabs? This meant I could sort the stars into piles, and had a key to follow, releasing the living room to normal use while I sewed them together.

Wednesday 27 May 2015

Doily challenge

Doily name Crochet 19

Pattern source onlycrochet.blogspot.co.uk 

Thread Anchor size 8 pearl cotton. 

Hook 1.25mm. 

Finished doily diameter 26cm

Finished doily weight 8g

Comments  This was the first charted pattern I tried.  Initially I struggled, but I found it much easier once I used highlighters to distinguish between the rows, and ticked them off by pencil as I went.  It was also my first attempt at blocking, and there is obviously a lot of room for improvement.


Sunday 26 April 2015

Ditzy dress

This is my first ever foray into dressmaking. It has been a very, very steep learning curve. I had thought that the transition from patchwork to dressmaking would be easy.  Sewing is sewing, right?
Little did I realise that there are actually two distinct skill sets involved with dressmaking: sewing (which is surprisingly different to patchwork), and fitting. The dress is McCalls m6959, and is classed as "easy". I struggled with every process in making this dress, and re-sewed several of the seams in order to get them pattern perfect. Then I tried the dress on, and it was awful! It fitted like a sack, and made me look totally tubular! Also the sleeves were far too taut, and I couldn't lift my arms away from my body without the whole dress feeling like it would rip across the middle.
So, having painstakingly sewn the whole thing so accurately, I took my dress along to class where the teacher pinned, and tucked, and adjusted until every single seam had to be re-sewn again. The mistake I had made was to cut the size corresponding to my largest measurement (waist). This meant that the bust and back darts all needed adjusting to bring the dress back in. What I should have done was to cut according to bust size, and adjust outwards at the waist. You live and learn. 
I'm not sure whether the arm problem was due to poor pattern drafting, or my physiology. It wasn't due to picking the wrong size. Although the circumference of the sleeve fitted neatly around my arms, and looked great with my arms hanging by my side, there was no movement at all. To solve this, I followed these tutorials (here and here)  and flattened the sleeve head. This would have meant that the original crescent shaped sleeve would have ended up very short. To counter this, I had to change the bottom of the sleeve from a concave to a convex curve. To give even more movement, I made this curve slightly longer than the original, thus increasing the diameter of the sleeve for more ease .
The third adjustment I made was to the length of the skirt. I added two inches to the original pattern, and this fell at mid knee. In the end I felt this was a bit frumpy, so cut an inch off again. I'm not entirely sure this was a good move, as although I prefer the shorter skirt, it now ends at just above my  knobbly knees, which is not such a great look either.


So, here is the final dress. I am very pleased that it looks like a proper dress. I am happy with my fabric choices. But, I'm pretty sure it won't turn into a favourite. Despite the arm adjustments, it is still annoyingly restrictive. The skirt is also a bit hit and miss. Because of the fullness, it has a tendency to flare up in the wind. Despite a safety pin holding the wrapover together, I had several Marilyn Monroe moments on a breezy seaside stroll. The other problem is that the fullness in the skirt has a tendency to all gather over my backside, which is not an area where anyone wants to add bulk.

I started this dress in January, and it was finished in mid April, just in time for some spring sunshine. So, one item crossed off my projects list this month, and a good dent in the fabric stash.

Monday 13 April 2015

Crochet doily project.

Not to be put off by the last post, which shows that I am hugely over optimistic when it comes to starting projects, I have hatched a new Grand Plan.
This plan is sort of secret, (mainly so I don't have to admit it if I don't acheive the goal). But I am very happy to share the progress along the way.
Inspired by Pinterest I have decided to do a great big crochet doily project. Eventually I will need something like 100 doilies (told you it was ambitious). A doily a week would take about two years, and a doily a day would whizz through in just over three months.
Having never crocheted anything small or lacy before, I thought I ought to practice before jumping in and buying all the materials. I have had this book for quite a while, and since snowflakes and doilies are kind of similar, I've practiced with a few of these.

On the advice of the lady in my local yarn shop I used 4-ply cotton, and a 2.5mm hook. Her advice was good, because I think these are a good size and weight for starching and hanging on a Christmas tree.
The next step in the plan was to try an actual doily. I followed a free pattern off pinterest. The crochet itself was quite easy, but the 4 ply was way too thick. This next photo shows the 4 ply made with a 2.5mm hook, next to the same doily made with size 8 crochet cotton and a 1.25mm hook.
The crochet cotton is much more what I wanted, this gives a light lacy feel, whereas the 4ply is more like a trawler net! The downside of the crochet cotton is that the doilies come out much smaller.

I have carried on with my pinteresting, and made two more doilies. I'm pleased that I've now learned to read charted crochet, I still haven't got the hang of predicting the finished size. I need to learn blocking next, so that they look a little tidier, then just crack on with the other ninety seven! Wish em luck!

Friday 10 April 2015

March review

Sometimes at work I go on soft-skills, corporate type workshops. Negotiation, influencing, that sort of thing. I learned that if a commitment is made publicly it is more likely to be kept. For me, declaring my sewing goals on this blog was supposed to be the public commitment needed to spur me on to action.
However, the lists show a different story.

Projects in progress
Lacy Scarf
Cross stitch train
Pink elephant
Minnie mouse bag.
Secret santa quilt
Summer dress
Party dress
Crochet doily project

New projects started
Threadcatcher pincushion
Snake

So, no finishes, and two new starts. However on the plus side, it has been lovely and sunny, and the garden is looking a lot more loved.

Thursday 26 March 2015

Crayola washable felt pens.

I have tried all sorts of things to mark my quilting fabrics and found advantages and disadvantages to them all.
This is a review of Crayola Supertips Washable markers. I got mine in WHSmith for £5.99. Other cheaper brands are available, but I can't comment on how washable they really are, and compared to the price of fabric, it's a bargain.
I like that these come in plenty of colours, so will stand out on almost any colour or pattern. I like that because it is a felt pen, it marks the fabric easily and accurately, but the line is quite thick. 
I used these pens to mark the quilting lines on C and R's quilt. The markings were in place for several months before I put the quilt through a cold wash after it was finished. All the marks washed out perfectly.
Here I have marked a piece of white 100% cotton.

Here is the back to prove I didn't use a light touch with the pens.
The instructions on the pack say to use a hot wash, but that isn't realistic for most quilting projects. I put this sample in at 40C with my normal laundry. This very unexciting photo shows that all the markings washed out completely.

Saturday 14 March 2015

World Textile Day Wales 2015

I have just returned from a lovely day out with my Mum to World Textile Day Wales.

This is an annual event in Llanidloes. There is a morning and an afternoon lecture session, and a nice break in the middle to get some lunch and do some shopping. There is a lot to tempt me on an occasional visit to Llani. even without the added bonus of the amazing stalls at the textile event.
I really enjoyed the lectures, but there was an awful lot to take in, so sorry the labels for my pictures are a bit vague.

Sashiko samples by Susan Briscoe. She gave one of the talks.

Chinese applique from 1930s. Imported by Slow Loris.
.

Beautiful reverse applique quilt from Southern Pakistan.

Close up of embroidery on another Pakistani Kantha quilt.

Can you guess what this is? We couldn't!
 
It's to decorate your camel for a wedding ceremony. The hump goes through the slit in the middle.

African textile.

And finally my goodies. I think I was very restrained.

Wednesday 11 March 2015

Bye bye winter blues

I didn't publicly make any New Year's resolutions this year, but I had a few goals in mind. Two months in, its time to review progress.

Goal number one- finish more projects than I start.

I think this goal is achievable, even though on current statistics it doesn't look good. I have two finishes so far this year, and I have three new WIPs. One is very nearly finished, so that will bring me back to even Stevens. 

Goal number two - reduce fabric stash to one box.

This is definitely not going so well. My shopping ability still far outpaces my sewing ability. The owner of my local fabric shop is so friendly and helpful, that I pop in all the time for advice. I would feel bad just taking the advice for free, and its very hard not to look around while I'm there. I do like to support local businesses, so really I am just being a responsible citizen and contributing to my local economy, and... Okay, I have no willpower. I have come to the conclusion that reducing my stash by buying less fabric is probably not going to work. The better way might be to sew more projects and reduce it that way. This would tie in nicely with Goal number one.

So, as a recap to myself on current position for 2015.

At the start of the year this was my list of projects in progress:
Scarf
Cardi for fox - abandoned.
Pink elephant
Sunshine waves blanket- finished and given away - gold star to me.
Minnie mouse bag
This blog - ongoing

New projects started:
Summer dress
Crochet doily project
Party dress

So, the goals for March are to finish at least one more project and not start any more. I will check back in to update on progress later.


Thursday 15 January 2015

Stormy seas

As I hide inside, snug and warm from the shrieking wind, inevitably I think back to last year's storms. This time last year, Aberystwyth hit the news when the seafront promenade took a beating. A few miles up the coast, Borth also suffered. Borth usually is a popular family beach- miles of gently sloping sand and shingle. Last year's storms though left this:

Some very topographical looking mud!

This isn't any old mud though, it's actually ancient peat. Further down the beach there is the remains of a petrified forest. Usually there are just a few slimy treestumps covered in seaweed, but after the storms a magical land was revealed. There is an interesting article and some beautiful photos on the national geographic website.


Conveniently for me, it was around this time that I finished my stormy seas quilt. A perfect opportunity to visit a local attraction, and photograph my quilt on location!

I love the modern simplicity of this quilt, but oh my goodness, it was bo-o-o-o-ring to make. Cutting, ironing, sewing strip after strip after strip. I will not be doing this again.

Monday 12 January 2015

First finishes for 2015

Yikes! Two finishes in the first week of January!
The first is the sunshine waves blanket. No prizes for how it got the name.
I love ripples, the waviness makes them just that bit better than an ordinary stripe.


I was going to do an all yellow, sunny sunshiney blanket, but it was a bit blah, so I added the blue border which I feel gives it more oomph.

Ripples are so simple I shouldn't really need a pattern, but I have a tendency to get a bit lost at the ends of the rows. For this one I followed the neat ripple pattern on Attic 24's blog. This ripple uses groups of four stitches (4tr, tr2tog x2, 4tr, 2tr increase x2). I usually use the pattern from Nikki Trench's Cute and easy crochet book. This uses groups of three stitches and I find it suits my rhythm of treble crochet better. (3tr, tr3tog, 3tr, 3tr increase). This photo shows the two side by side, and I can't really tell much difference.

The stats.
This was made in double knitting yarn on a 4mm hook. I can't name any of the yarns, as they're a pot luck of whatever yellows I already had. It weighs 370g, and is 75 x100 cm.

Caddy bag
The blanket above was started in December, but this bag is so quick and easy it's a true 2015 creation. I'm guessing I took about 4 hours in total, but some members of my quilting class can whip these out in an hour and a half. I find it a great way of using up the samples I have made in class. (The stars on the pockets are the results of my paper-piecing lessons).


It's not the most beautiful design created, but really is so useful to keep things tidy. Here is a smaller one I use to take to sewing class. I carry my fabrics in the main compartment, and stuff my scraps for sorting into the pockets.