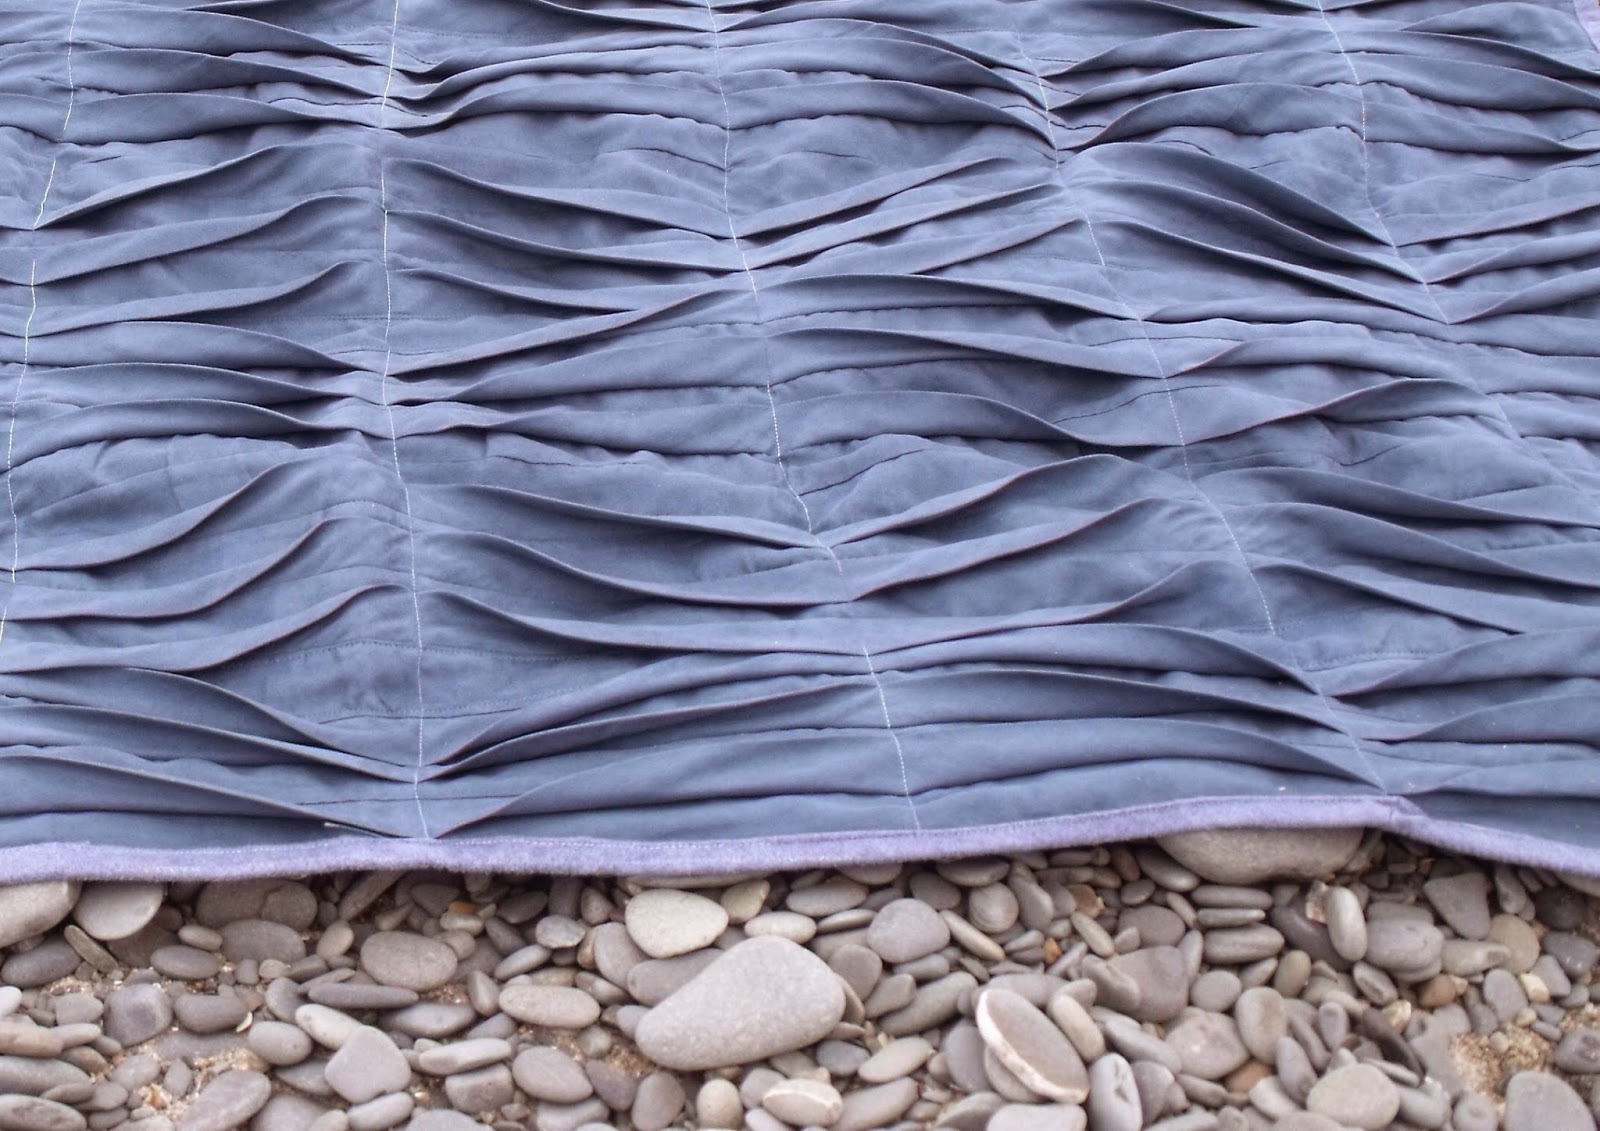
As I hide inside, snug and warm from the shrieking wind, inevitably I think back to last year's storms. This time last year, Aberystwyth hit the news when the seafront promenade took a beating. A few miles up the coast, Borth also suffered. Borth usually is a popular family beach- miles of gently sloping sand and shingle. Last year's storms though left this:
Some very topographical looking mud!
This isn't any old mud though, it's actually ancient peat. Further down the beach there is the remains of a petrified forest. Usually there are just a few slimy treestumps covered in seaweed, but after the storms a magical land was revealed. There is an interesting article and some beautiful photos on the national geographic website.
Conveniently for me, it was around this time that I finished my stormy seas quilt. A perfect opportunity to visit a local attraction, and photograph my quilt on location!
I love the modern simplicity of this quilt, but oh my goodness, it was bo-o-o-o-ring to make. Cutting, ironing, sewing strip after strip after strip. I will not be doing this again.
Thursday, 15 January 2015
Monday, 12 January 2015
First finishes for 2015
Yikes! Two finishes in the first week of January!
The first is the sunshine waves blanket. No prizes for how it got the name.
I love ripples, the waviness makes them just that bit better than an ordinary stripe.
I was going to do an all yellow, sunny sunshiney blanket, but it was a bit blah, so I added the blue border which I feel gives it more oomph.
Ripples are so simple I shouldn't really need a pattern, but I have a tendency to get a bit lost at the ends of the rows. For this one I followed the neat ripple pattern on Attic 24's blog. This ripple uses groups of four stitches (4tr, tr2tog x2, 4tr, 2tr increase x2). I usually use the pattern from Nikki Trench's Cute and easy crochet book. This uses groups of three stitches and I find it suits my rhythm of treble crochet better. (3tr, tr3tog, 3tr, 3tr increase). This photo shows the two side by side, and I can't really tell much difference.
This was made in double knitting yarn on a 4mm hook. I can't name any of the yarns, as they're a pot luck of whatever yellows I already had. It weighs 370g, and is 75 x100 cm.
The blanket above was started in December, but this bag is so quick and easy it's a true 2015 creation. I'm guessing I took about 4 hours in total, but some members of my quilting class can whip these out in an hour and a half. I find it a great way of using up the samples I have made in class. (The stars on the pockets are the results of my paper-piecing lessons).
It's not the most beautiful design created, but really is so useful to keep things tidy. Here is a smaller one I use to take to sewing class. I carry my fabrics in the main compartment, and stuff my scraps for sorting into the pockets.
Wednesday, 31 December 2014
Eskimo kisses
I made these two complementary quilts for my brother and his fiancee. The fabulous penguin prints are from the eskimo kiss range by timeless treasures. For the second quilt, the main fabric is the very pretty tree print. I wanted wintery fabrics to add to the snuggliness, but not Christmas fabrics which would mean they were only used for a month at most. Although these two fabrics don't go together because the patterns are such different styles, the colours coordinate perfectly.
To tie the two quilts together, I planned to use the same secondary prints between the feature fabrics with a mix of blues, greens and greys in a random layout. Here is my first layout.
It was alright, but despite all the individual fabrics being lovely, the overall effect was a bit drab. After arranging and rearranging, I came to the conclusion that more white was needed to lift it.
Here are the two finished quilt tops. I think that simpler layouts let the patterns in the fabrics take centre stage, and also it was quick and easy. I swapped a few squares from one quilt to the other to tie them together.
I backed the quilts with lovely super soft and snuggly fleece. It really added to the wintery feeling, as the living room looked like it had been hit by the weather bomb, and I resembled a snowman! Green and blue fluff everywhere.
For the quilting I did simple stitch in the ditch. To get the quilting lines to disappear, you need to be accurate to a fraction of a millimeter. Since I took quilting lessons last year, I have spent a lot more time sewing, and while practice hasn't quite made perfect, I am a lot closer.
To tie the two quilts together, I planned to use the same secondary prints between the feature fabrics with a mix of blues, greens and greys in a random layout. Here is my first layout.
Here are the two finished quilt tops. I think that simpler layouts let the patterns in the fabrics take centre stage, and also it was quick and easy. I swapped a few squares from one quilt to the other to tie them together.
I backed the quilts with lovely super soft and snuggly fleece. It really added to the wintery feeling, as the living room looked like it had been hit by the weather bomb, and I resembled a snowman! Green and blue fluff everywhere.
For the quilting I did simple stitch in the ditch. To get the quilting lines to disappear, you need to be accurate to a fraction of a millimeter. Since I took quilting lessons last year, I have spent a lot more time sewing, and while practice hasn't quite made perfect, I am a lot closer.
2014 creations

It's traditional at this time of year to reflect on what has passed, and speculate on what might come. So here is a summary of my creations from the last year, with links where I have blogged them.
Projects Finished in 2014
Waves quilt
Various crochet
Lots of taggies
Caddy bag
C and R wedding quilt
Totes best friend
Eskimo kiss cuddle quilts
Fir tree and advent panels
I am very pleased to see that the list above is longer than the one below which is projects that are started but not finished.
Things in progress
Scarf
Cardi for fox
Pink elephant
Sunshine waves blanket
Minnie mouse bag.
This blog ;-)
I'm not even thinking about my projects planned list!
Wishing a happy and healthy 2015 to you all!
Wednesday, 17 December 2014
Christmas quilting
This week I have been frantically finishing Christmas sewing projects. I have two gift quilts which I will post after Christmas when they have been received by their new owners. I have made myself two decorations - a paper pieced fir tree panel, and an advent calender.
Makower cool yule advent panel
This panel was made using a pattern designed by my quilting tutor Melanie Hughes. She doesn't have a website, but does have a facebook page. Several people in the class made this panel, and it works really well with a wide variety of fabrics. A similar free pattern can be found Here..
Makower cool yule advent panel
I made this advent calendar with a pre-printed panel. It was very easy to make. It comes with instructions printed on the side of the panel, but these are very brief, so I also used a tutorial on you tube for a bit of clarity. The panel was made very quickly, the slowest and most tedious part was knotting and tidying all the thread ends. Automatic knotting is definitely high on the wish list for my next sewing machine. To add a little more sparkle, I outline quilted some of the details with shimmery thread. I am thinking about adding some seed beads and sequins by hand too.
The two threads I used were guterman dekor metallic thread and Guterman sulky holoshimmer, shown in the picture below. The dekor is at the front.
Of the two, the best by far was the sulky thread, which is probably why it cost twice as much. It is made of a single flat ribbon of shiny plastic, so it does not fray, and is easy peasy to thread through the needle. The metallic thread looks equally beautiful, but was horrible to work with. I had to use a needle threader to get all the strands through, and it frequently frayed during sewing, leading to only some strands being sewn, and the broken ones accumulating in a big knotty clump at the needle. I then had to cut the thread, pick out the mess, re-thread, and start again.
Apart from price, the only other advantages I could see of the metallic thread are that it coped better with heat. The holoshimmer thread went a but crispy when I ironed over it. I was worried it would melt to the bottom of the iron, but it didn't.
Thursday, 11 December 2014
The Jellyfish quilt
In this post I'll explain how I made the starburst side of C &R's wedding quilt. Because of the somewhat squiffy nature of these stars, this quilt was nicknamed "The jellyfish quilt" in our household.
Good old google came up with this free pattern Rainbow stars from mccalls. The instructions were very clear and easy to follow. The sewing however was very difficult.
Each of the stars I made used the same combination of fabrics, but in different positions. This process needs a little bit of organisation, in order to keep the fabric sets from getting mixed up.
I used zip lock sandwich bags to organise my fabrics. Each star in progress was kept in its own zippy bag, and I wrote a key on a scrap of paper which I kept in the bag.
As each step of the process was done, I took the pieces out of the labelled bag, and then put them straight back in when done. I even carried the sewing from the machine to the iron and back in the bag.
This system worked really well for me, and amazingly I didn't get any mix ups in the whole quilt.
Where I did fall short though was accuracy. Accurate seams and cutting are essential to prevent your stars from looking like jellyfish. When my stars were finished they were mostly a bit squiffy in the middle and didn't lay flat at all. There was no way that I could have inset squares neatly between them to make a quilt top.
What I did instead was applique the stars onto a plain brown background. Because the tips of the stars were also dark brown, I outlined the stars with strips of shot gold fabric. To fill in the huge amount of empty space between them, I made smaller stars and appliqued these on too. What is now glaringly obvious, but I didn't notice at the time, was that I accidentally used a different background brown for some of the stars.
Because of my difficulties with accuracy, and the mix ups with the browns, I wasn't happy with the quilt top. I believe that when something looks "handmade" this should mean that it looks like it was individually made, not that it looks a little bit crummy. In my opinion this quilt top fell short of the mark. I didn't feel that it was of high enough quality to give as a gift. However, I didn't want to waste the years of work, or the yards of fabric that had gone into it. The compromise I made was to use this as the back of the quilt, and to start again with a new and improved top...
What I did instead was applique the stars onto a plain brown background. Because the tips of the stars were also dark brown, I outlined the stars with strips of shot gold fabric. To fill in the huge amount of empty space between them, I made smaller stars and appliqued these on too. What is now glaringly obvious, but I didn't notice at the time, was that I accidentally used a different background brown for some of the stars.
Because of my difficulties with accuracy, and the mix ups with the browns, I wasn't happy with the quilt top. I believe that when something looks "handmade" this should mean that it looks like it was individually made, not that it looks a little bit crummy. In my opinion this quilt top fell short of the mark. I didn't feel that it was of high enough quality to give as a gift. However, I didn't want to waste the years of work, or the yards of fabric that had gone into it. The compromise I made was to use this as the back of the quilt, and to start again with a new and improved top...
Monday, 8 December 2014
C and R's wedding quilt.
In 2007 my good friend C married the love of her life, R. They didn't have a wedding list, so I offered to make them a quilt. "It might take a year or two" I said.
Seven years later, they are happily still very much in love, and last week I finally delivered their wedding present.
The full story of why and how this took so long will go in another post, but for now I think I will just show the finished product.
The quilt is an enormous king size, and because of the horrible rainy weather I couldn't take it outside to photograph. It covers the whole of my living room floor, and even holding my camera up at the ceiling I couldn't capture the whole thing.
I love this gold binding, and here you get another hint why I was so slow. Yes, it is double sided.
And yes, it is hand quilted.

After so many years in the making I was so very, very anxious when I finally gave it to its intended recipients. To my huge relief, they loved it.
Seven years later, they are happily still very much in love, and last week I finally delivered their wedding present.
The quilt is an enormous king size, and because of the horrible rainy weather I couldn't take it outside to photograph. It covers the whole of my living room floor, and even holding my camera up at the ceiling I couldn't capture the whole thing.
I love this gold binding, and here you get another hint why I was so slow. Yes, it is double sided.
And yes, it is hand quilted.
After so many years in the making I was so very, very anxious when I finally gave it to its intended recipients. To my huge relief, they loved it.
Subscribe to:
Posts (Atom)